December 03, 2010
Round Ornaments
Ladies, here is an idea that y'all can do. I am designing these little round "ornaments" for folks. They get a 600dpi scanned image of the design to use online to make round ceramic ornaments from Kodak at http://www.kodakgallery.com/ornaments/pc-Fine_Ornaments-c-Photo_Gift_Ornaments
November 30, 2010
For Grace to Labor
November 15, 2010
Carrie's Other Family Tree
Carrie's Family Tree
November 11, 2010
November 01, 2010
Julia
Julia just learned these letterforms today, and here is what she did. She is a true artist who brings all of her talent and passion into the world of calligraphy. She is a member of TCG now and we are very fortunate indeed to have her! I am looking forward to all of the many things we will be able to learn from her.
September 25, 2010
thanks!
September 16, 2010
Martha's Art
Well, we are done with our Italic Brush Lettering and here is Martha's practice sheet from tonight. I loved the colors she'd pick. Always so soothing and peaceful and elegant. I hope to be getting a lot of either really cute cards in the mail from these gals, or at least a really cute envelope!!
(Martha lucked out on the Sept 3rd post, but I snagged her paper tonight!)
September 14, 2010
For Richie
Hey, girls! A friend of mine said she was putting together a book for a mutual friend of ours who was turning 60. Friends could contribute photos and letters to him. I decided to do a calligraphic piece, hoping it would be a little different than the rest. Thought y'all might like to see it since I used our fabulous le Plume brush. This was done on Aquarelle Arches Watercolor paper that comes in a pad. Also used the black micron pen and watercolor pencils.
This was FUN and EASY and it was the quickest project I've ever done.
September 07, 2010
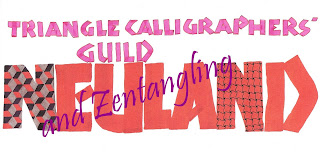
Neuland Hand and Zentangling
September 06, 2010
This is a piece I did as a wedding gift this summer. I made a copy on a parchment-like paper of a version of the scripture I had done a while ago, then added the names and wedding date. I made some paste paper in their colors of aqua and brown and used scrapbook paper for the brown hearts. The dried flowers are some I had from South Carolina (where the couple is). Their china is yellow, so I tried to pick up that color with the flowers.
I couldn't even have attempted this a year ago before my classes in paste paper and copperplate and encouragement from you all!
September 03, 2010
Brush Lettering Session One
Nell, Adrianne, Martha, and Harriet joined me at my house last night for Session One of the Italic Brush Lettering Class. A fifth gal will be joining us next Thursday. Here are some of the practice sheets from the gals!!
The top pic shows "The Flick" (thanks, Nell). The other two show the "Tilted Almond Shape" (thanks, Adrianne and Harriet). Since our Martha used grey for her practice brush, the color did not show up through the copy machine! We gave her a break this week, but she is under the gun for next week!!! We might force her to use a red!
Clothesline Lettering
September 02, 2010
Birthday Card
This is a birthday card I just made.
I drew the picture and letters with pencil
then outlined them in a micron pen and
decorated the letters. Then just colored
with watercolors. I used watercolor
paper. Something fun and easy.
Italic Brush Lettering
Gals,
I am looking forward to our getting together tonight for the Italic Brush Lettering Class with Marvy le Plume brushes. Fun!! I will be posting some of our stuff on our blog since y'all are right here where my scanner is!
Kerr
I am looking forward to our getting together tonight for the Italic Brush Lettering Class with Marvy le Plume brushes. Fun!! I will be posting some of our stuff on our blog since y'all are right here where my scanner is!
Kerr
August 09, 2010
I made Stampbord charms of a map of Atlanta for friends that we visit in Georgia. I decided to put a resin finish on them after this photo was taken. I used Envirotex Life which I purchased at Jerry's Artarama. It has both the resin and hardner which you need to use. It makes a big difference in making the charms POP.
Posted by Nell Hall
Posted by Nell Hall
July 30, 2010
Ice Prints
I had fun making ice prints last fall. I collected leaves I liked and first pressed them dry for a few days. I just put them on parchment paper and put them in a book which I weighted down. When dried, take a piece of heavy watercolor paper (hot or cold press) and soak it in water for 5 minutes and put it on foamcore or styrofoam. While the paper is wet drizzle watercolors on it. Next lay the dry leaves on the paper, pressing on the leaves lightly to get out air bubbles. Put the paper in a level spot in the freezer overnight. Take out the prints and leave for a few days to dry thoroughly before peeling off leaves...and voila! Enjoy them as they are go use as cards or the background for Calligraphy.
Posted by Nell Hall
Posted by Nell Hall
July 26, 2010
Using Paste Paper made in Jerry's Journal Page Class
I did this for my Mother. She turns 92 tomorrow! She and Daddy (also turning 92) are both sharp cookies, still live on their own, and Daddy still drives them everywhere. Amazing.
My Mother is an avid reader, and one of her all-time favorite authors is John Irving. If she ever hears that you have read A Prayer For Owen Meany, you will be on her short list. It is #1 on her list, and I must say that it is also #1 on mine. Best ending ever!
"Keep passing the open windows" is a recurring phrase that the Berry family uses in The Hotel New Hampshire. It is their way of telling each other to persevere.
Since my Mother has lived to be 92, I feel she is A Perseverer!
This piece of paste paper was made in that Beautiful Beginnings journal page class that I took along with Nell and Harriet at Jerry's. You can see it in the post below sans lettering. This is so much more fun than writing on plain white paper!
July 21, 2010
Last night I worked on this Zentangle. I had made a file containing copies of designs and instructions on how to construct them, so I decided to actually do one. From what I have seen online, most of the Zentanglers stick to designs to fill in the "strings." I wanted to incorporate this into lettering (of course)! So, this is my first attempt. I have some more ideas that I will be using and am pretty excited about it. Not enough time in a day.
This was done in a lettering journal that I practice in. I used Faber-Castell Pitt Pens to do the lettering and coloring and just used a micon pen to do the drawing. Next time, when I am serious about it, and after a bit more practice, I will use watercolor paper and watercolors and maybe a "real" calligraphic pen.
I am scheduled to share at the TCG meeting in September about the Neuland Hand. I think I will incorporate Zentangling into the letterforms...just to make it a bit more interesting!
July 19, 2010
Journal Pages
Nell, Harriet, and I took a Beautiful Beginnings class at Jerry's Artarama today.
First of all, it was such great fun to take this with friends. I highly recommend doing that! This 2-hr class was all about making journal pages. All three of us kind of figured out that it was basically what Mary Lou taught us at her house, only this time, instead of being individual pages to use as book covers or backgrounds for lettering individual pieces, the techniques were to be used on each and every page of a journal.
Deb, thought of you. This woman, Ophelia Staton, wakes up at 4am to journal! I do not know who is more dedicated to daily journaling...you or her! Visit her blog at http://opheliasart.blogspot.com/ to see her work.
At any rate, I really enjoyed it. After the class was over, I asked the group if anyone would be interested in learning calligraphy - that Nell, Harriet, and I were in a Calligraphy group and that I taught at Jerry's. EVERYONE wanted my card!
Watch out girls, our group might be expanding!
July 13, 2010
Info for Stampbord Charms
Below is some info already given in the emails, but Peggy thought it might be a good idea to have it here so it is all in one spot.
The liquid that was applied to the moon on my charm is called Inkssentials Glossy Accents. It is a clear embellishment.
Here are some other links that I have enjoyed :
July 12, 2010
Stampbord Charms
This workshop was not necessarily calligraphic, but when you are a letterer. . . letterist, calligrapher, calligraphist, whatever you want to call yourself. . . you are and ARTIST. And that leaves a lot of room to play. And play, we did!
Anything we learn can somehow make its way into our lettering world, can't it? That was my whole purpose in taking watercolor classes; to meld that medium with lettering. A whole new world was opened up to me as a result.
So, even though these little tiles did not start off strictly as letterforms, I am pretty sure that one, if not all of us, will take them there!
I cannot wait to see what you will bring to the table!
Subscribe to:
Posts (Atom)